How to Build a DIY Owl Box
Owls are enjoying a comeback in Texas. In recent years, everyone from farmers to bird lovers has come to appreciate the joys and benefits of attracting owls to their land. Owls are being used for natural pest and rodent control in vineyards, orchards, and farms. And people in more urbanized environments are erecting owl boxes to help the wise old birds (or their babies) find comfier places to roost.
Contrary to popular belief, you don’t have to be a first-year at Hogwarts to bring an owl into your life. All you need is some wood, tools, and a little planning to get your backyard DIY owl box up and hooting.
Planning Your Owl’s Home
What kind of owl are you hoping to attract? Do you want to create a box that will be large enough for a nest and an owl family? Having ideas like these in mind are important first steps in designing your owl box. Here are three important considerations as you plan out your DIY owl box:
1. The Location
The two biggest considerations when choosing a location for your owl box are heat and space. Ideally, an owl box should be placed in a shady, thinly wooded area, which creates a straight flight path for owls to glide back after hunting. If you don’t have this kind of space or environment, you can attach your owl box to an existing structure, like a barn, shed, or tall tree.
2. The Position
Boxes should be positioned so that the entry hole faces east or west to prevent the box from heating up too much during the day. It is also important that owl boxes are painted white so that they can reflect heat and keep the box as cool as possible during Texas’ hot summer days.
3. The Entrance
Keep the size and location of the entrance hole in mind, as it can impact the functionality of the owl box. A hole should be just large enough for the owl to squeeze through but small enough to keep other creatures out, while giving the birds a sense of safety and security. In a box designed for nesting, the entry hole should also be located at least 6 inches from the floor of the box to prevent little chicks still learning to fly from accidently falling out.
The DIY Owl Box Blueprint
The following design is adopted from a blueprint created by retired Baylor University biologist Fred Gehlbach. The design is ideal for attracting screech owls, which he studies. Gehlbach also tells the National Audubon Society that, in his experience, these boxes work best for attracting owls to suburban environments.
While the design suggests using cypress, you can also use cedar, pine, or an outdoor plywood. “The more weathered the better,” Gehlbach tells Audubon.
You’ll need:
1 cypress board, ¾” thick, 1″x10″x8′
2 exterior hinges with hinge screws, 1 ½”x1 ½”
30 exterior-grade deck screws, 2″
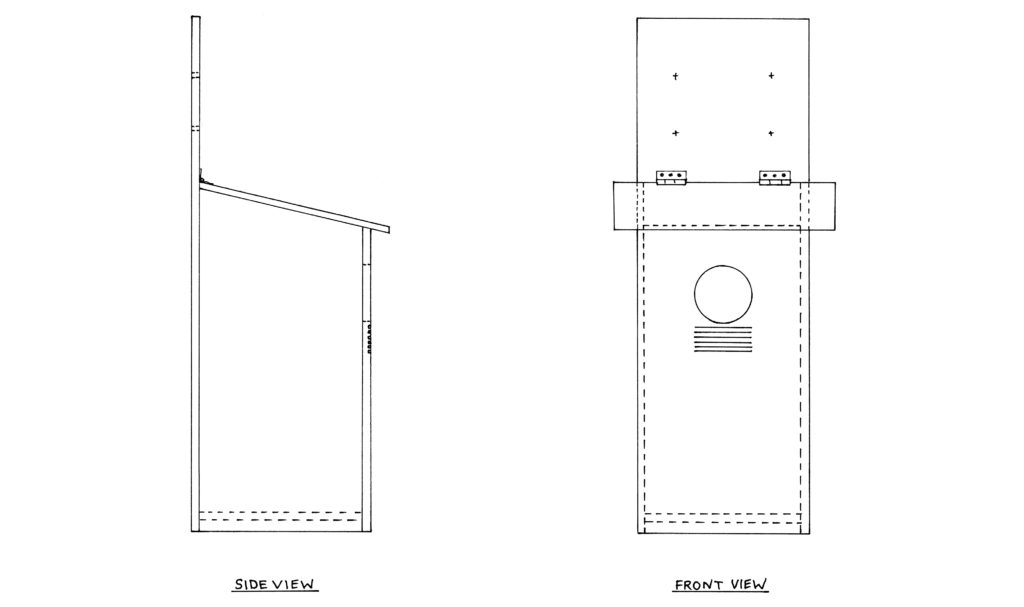
Step 1: For the structure of the box, sketch out (use these drawings for reference) and cut the following six piece shapes onto the 8-foot cypress board:
- Back: 27.5″x9.5″
- Front: 15″x9.5″
- Two Sides: 17″x8″
- Floor: 8″x8″
- Roof: 9.5″x11.5″
Step 2: Prepare the front of the box. Measure and cut out a 3-inch entrance hole about 10 inches from the bottom of the board. Using a saw, make four or five kerf cuts beneath the entrance hole. These will help with ventilation and give the owl an easier grip on the side of the box beneath the entrance.
Step 3: Using ¼-inch drill bit, drill a series of four to six drain holes in through the floor piece. Then pre-drill the front and side pieces so that the front piece fits flush with the front edge of both side pieces. Attach the front and side with screws.
Step 4: Fit the bottom piece so that it is ½-inch from the bottom edge of the front and side pieces. Drill and attach with screws.
Step 5: Place the long back piece so that it fits flush with the edges of the two side pieces. Pre-drill holes and then attach with screws.
Step 6: The roof will not be attached directly to the box but will sit on top, connected via a hinge to the back piece. This will allow the box to be opened for cleaning and maintenance. Attach the two screws evenly — about 1 ½ inches from the edge of the roof — then attach with screws to the back piece.
Step 7: Before mounting your box, place a few inches of wood chips or leaves at the bottom of the box to create comfy padding for the birds.
Step 8: Mount your box about 10 feet off the ground on a post or attached to a building. If you are mounting it to a tree, be sure that the tree is straight and that the width of the tree is greater than the width of the box.
As you wait for an owl to move in, consult our field guide to Texas birdwatching in preparation for any other birds who might stop by.
© 2020 Texas Farm Bureau Insurance